Unfortunately, not everyone has the opportunity to grow various garden crops in the open field.
If you want to grow tomatoes on your own, but there is no land for it - the balcony is a great alternative.
Breeders for this type of gardening have created special varieties of tomatoes that everyone can grow on their balcony, putting in just a little effort.
How to choose a variety, plant tomatoes and care for them - all this you can learn from the article!
Is it possible to plant tomatoes on the loggia?
It is certainly possible to grow tomatoes on the balcony, the main thing is to choose a variety that corresponds to the task, correctly and gradually carry out the planting procedure and provide the tomatoes with proper care at home throughout the growing period, from seedlings to fruiting.
Advantages and disadvantages
The most significant advantage of growing tomatoes on the balcony is accessibility. No need for land, no need to spend time on the road, getting to the garden.
The disadvantages include a small space, so that the volume of the harvest is limited.
Preparatory activities
A place
The place where it is planned to grow tomatoes, that is balcony or loggia should go to the south-east or south-west side. If the balcony faces south, the seedlings will be too hot and they will have to shade. Also, if the balcony is located on the north side and the sunlight will reach the plants for less than three hours a day, it will not be possible to get a harvest.
Note. When choosing a place for tomatoes on the balcony, it is better to give preference to walls and railings, it is important that the plants are protected from the winds, and if the balcony is glazed, regular airing will be required.
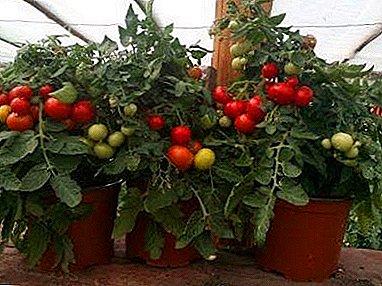
Special varieties and their photos
Special varieties have been developed for growing on the balcony; if space permits, tall options can be cultivated.
Ideal for stunted and dwarf varieties. All varieties intended for the balcony are self-pollinated.
Most popular
Next, tell about the most popular undersized varieties, as well as show their photos.
Angelica
Early variety. Fruits ripen on the 80th day after germination. Fruits are ovate with a sharp nose. Grow clusters of six to ten pieces. Bushes do not need support.

Pearl
Unpretentious variety with an elongated shape of tasty fruits, growing in bunches of up to seven pieces. The height of an adult bush does not exceed 40 cm.

Tall
Ballerina
Rose-shaped tomato pear-shaped.

Romantic
High-yielding variety, reaching a height of 1.6 m, fruits are small, not more than 50 grams, regular round shape.

Dwarf
Bonsai
Fruits weighing no more than 25 grams. The plant is decorative, looks like a small bush.

Pot material and size
For growing, you can use absolutely any plastic containers. At the seed germination stage, small bottles can be used, and after transplanting into large ones, ordinary flower pots with a capacity of at least five liters will also do.
Priming
The best solution is to purchase a special ready-made soil mix for tomatoes in the store, or prepare it yourself by mixing turf and humus in equal shares and adding peat or sawdust to improve soil looseness.
The process of planting balcony tomatoes
Next, we will tell you how to plant the seeds of red balcony tomatoes at home correctly, so that the indoor plant will stick and will further delight you with its fruits.
Seeds
Before planting, the seeds must be prepared:
- Dip them in a light pink solution of potassium permanganate and etch for three hours. Instead of potassium permanganate, you can use Fitosporin or Trichodermin, which have a fungicidal effect and are capable of destroying the diseases on the seeds that are not visible to the naked eye.
- After disinfection, seeds are processed by biostimulants, such as Epin-Extra or Zircon, this will increase germination.
- Seeds are placed in moistened gauze and left on the bottom shelf of the refrigerator for a couple of days, it will harden them, make them resistant to temperature changes.
The seeding process itself is as follows:
- Expanded clay is laid on the bottom of the tank and the prepared soil is on top.
- The earth is shed with warm water and after it is well absorbed, grooves 1 cm deep are made across the entire width of the tank. The distance between the grooves should be 4 cm.
- In the received deepenings, seeds are laid out with an interval of 2-3 cm from each other, sprinkled with earth and covered with a film.
Seedlings
- Seedlings need to be tempered regularly, opening the windows on the balcony on warm days for a few hours and closing them overnight. If the lower part of the main stem has acquired a blue tint - this indicates that the plant's immunity has increased and it is adapted to cold temperatures.
- Acquired seedlings are planted in a permanent place, if they have reached one month of age, by this time the plants have from four to six true leaves.
- Simultaneously with the transplant, a dive of the seedlings is carried out, which allows the roots to grow, strengthen and effectively convey useful elements to the plant.
- Low-growing varieties are planted in two with a distance of five to ten centimeters from each other, if the plant grows in large capacity, then the interval should be increased to 40 cm.
- Immediately after planting, the windows on the balcony should be prehenit and maintain the temperature in the region of 18-20 degrees, when the stems straighten and the leaves spread, it will take a couple of days, shading can be removed.

Now you know how to plant tomatoes correctly - seeds and seedlings - in an apartment, then we will talk about the rules of care.
How to care: step by step instructions
Watering and fertilizer
Important! It is impossible to use tap water to irrigate the tomatoes, it is too hard. Warm water settled for two days is best.
The ground in the tanks should not be too wet in such an environment, the roots begin to choke and the plant dies. Also, you should not allow overdrying of the soil, the roots will begin to dry, and the tomatoes turn yellow. Watering should be carried out according to the scheme once every three days. After watering, it is necessary to loosen the soil. If the weather is cloudy, you need to move away from the schedule and water the plant less often, focusing on the degree of drying of the soil.
The first dressing for tomatoes can be made 40-50 days after planting. The best fertilizer - humus, which can be purchased in the finished version in the store. It is added to the ground at a height of two centimeters, thanks to which the roots are saturated with oxygen and receive all the necessary nutrients for development. The procedure is carried out three times before moving the tomatoes into a permanent container.
Trimming and Pinching
 As the plant grows, the stepchildren appear on it, they need to be removed, forming plants in one, two or three shoots.
If the seedlings are high - the best will be the formation of one or two stems, and if low, then three.
Once the ovaries have formed, you can remove the lower leaves, Also required to remove spoiled and yellowed leaves.
When the plant is completely formed, pinch the top and inflorescences so that at least four of them remain. It is necessary for the healthy development of seedlings.
Props and hanging
Only tall varieties need backup. In this case, so that the stem does not bend under the weight of the fruit, it is tied to a support. You can also hang pots with undersized and dwarf varieties to save space.
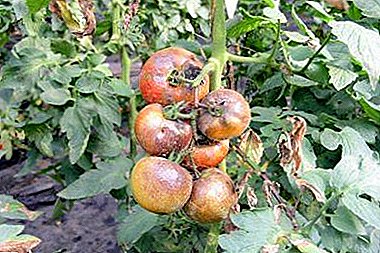
Diseases and pests
Tomatoes grown in closed containers are more often affected by fungal diseases than crops grown in open ground. To avoid this kind of ailments, the balcony should be regularly ventilated or, if possible, kept open around the clock, closing only in wet weather with a decrease in temperature.
Common diseases:
- The black leg - the root neck of the seedling darkens, thin and rot.
- Anthracnose - a sick plant fades, the root neck rots.
- Gray rot - on green or ripened fruits appear rounded spots, gradually increasing and becoming watery.
- Brown rot - manifests itself in the form of a brown spot around the stem, the inner tissue of the fetus is rotting.
Balcony tomatoes can be affected by pests:
- Spider mite - sucks the juice from the leaves and braids them with a thin cobweb, the plant dies.
- The whitefly - the insect sticks to the leaves, as a result of which they become covered with black bloom and dry up, the plant dies.
Important! To scare off pests, pots with mint, oregano or parsley can be placed next to the tomatoes.
Features of growing outdoors
Growing tomatoes on the open balcony is carried out according to the same pattern as on the glazed one, the only difference is in the dates of sowing of seeds and the content of seedlings. Sowing should be carried out in March than the north of the region, the closer to the end of the month.
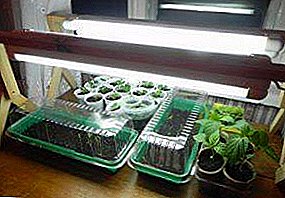
The box with shoots needs to be kept in the room on a window sill, lighting up with luminescent lamps.
With the arrival of warm days, the boxes are moved to the balcony, first for half an hour for hardening, then for several hours. The procedure is carried out every day.
After picking, seedlings should be kept in the room for two more days after which the pots with tomatoes are carried out on the balcony.
The procedure for growing tomatoes on the balcony is not technologically complex. This method is successfully used by experienced gardeners, and this method can also be recommended for novice garden cultivators.