The main goal of poultry farmers is a high rate of breeding healthy and strong chicks as a result of incubating eggs, which is impossible to achieve without using a quality incubator. There are many models of incubators, which differ in functionality, capacity and other special characteristics, allowing to distinguish them from other similar devices. Today we will look at one of these devices - "TGB-210", its detailed description and characteristics, as well as instructions for use at home.
Description
The model of the incubator "TGB-210" has significant differences from other similar devices. First of all, attention is drawn to its appearance.
Did you know? The first simple incubators for breeding chickens were built 3,000 years ago in Egypt. To heat such devices they set fire to straw: it kept heat for a long time.
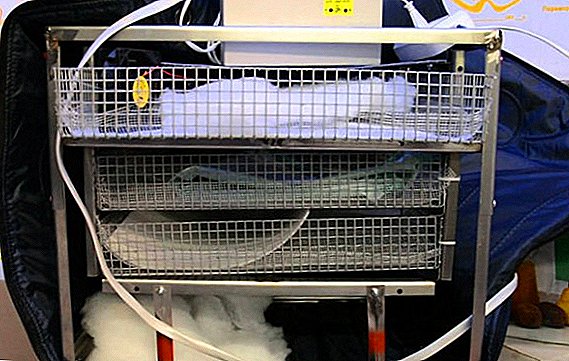
The main difference is the lack of walls, as this device is made of metal corners and covered with a removable cover of high-quality washable material. 
The case contains heating elements that allow to warm up all sides of the frame efficiently and evenly.
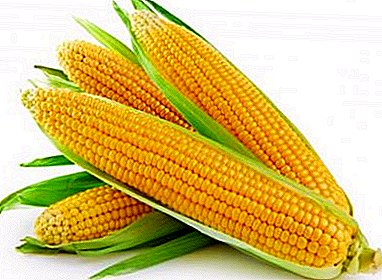
The device is designed to heat eggs - chicken, duck, turkey, quail, goose.
You will also be interested to learn about the features of incubation of Indoor and Guinea Fowl eggs.
The designation "210" is an indicator of spaciousness, that is, this model can accommodate 210 chicken eggs. The device contains three trays, which, respectively, can place 70 eggs each.
A device may have several trays turning mechanisms:
- autowhen a program is established in the incubator, and the egg is turned over according to it, without human intervention;
- manual - requires human intervention in order to change the position of the trays. To do this, use a special lever that allows movement of the trays.

The main positive feature of the "TGB-210" is the presence of some technical innovations that allow to reach almost one hundred percent hatchability of chicks.
These innovations are represented by the presence in the incubator:
- biostimulator, which allows to reduce the incubation period, which is associated with the presence of an acoustic system that can make sounds in a certain range, imitating the hen;
- Chizhevsky chandeliers, which contributes to increasing hatchability of chicks;
- built-in digital thermostat that allows you to set the temperature to be stored in the device and can later be used for subsequent egg laying without adjusting this indicator.
Learn how to choose a thermostat for an incubator, and whether you can make a thermostat yourself.
Incubators "TGB" are among the best for home breeding chicks. The manufacturer of the "TGB-210" - "EMF", the country of origin - Russia. 
Specifications
Consider the main technical characteristics of the incubator "TGB-210":
- the weight of the device is 11 kg;
- dimensions - 60x60x60 cm;
- maximum power consumption is 118 W;
- electric power can be supplied: from the home network, battery from the car - 220 V;
- the number of turns of trays per day - 8;
- temperature range - -40 ° C to + 90 ° C;
- temperature error - no more than 0.2 degrees;
- service life is at least 5 years.
The capacity of this incubator is 210 pcs. chicken eggs, 90 pcs. - goose, 170 pcs. - duck, 135 pcs. - turkey, 600 pcs. - quail. 
Incubator Functionality
The main features of the incubator "TGB-210" is the presence of:
- thermostat;
- adjustable humidifier;
- a swivel mechanism that allows you to simultaneously flip all the trays with eggs;
- a ventilation system that prevents eggs from overheating during the second half of the incubation period, which is a problem for large waterfowl eggs.
Important! In order to be able to use the incubator during periods of power outages and not disrupt the incubation process, the "TGB-210" can be connected to a backup power source, which is purchased separately.
Most new models have digital thermostats that allow you to set the required temperature and monitor it on a digital display. 
The presence of an ionizer - Chizhevsky chandeliers, allows you to increase the number of negatively charged ions, which contributes to a better development of embryos and minimizes the possibility of developing problems with hatching eggs.
It will also be useful for you to learn how to make an incubator from an old refrigerator. And also about the technical characteristics of such incubators as "Blitz", "IFH-500", "Universal-55", "Sovatutto 24", "Remil 550TsD", "IPH 1000", "Titan", "Stimulus-4000", "Covatutto 108", "Egger 264", "TGB 140".
Advantages and disadvantages
The merits of the TGB-210 are due to:
- ease of construction;
- ease of installation of the device;
- its small size, which is an undoubted advantage when transporting and placing in a small room;
- the possibility of reducing the process of incubation of eggs due to the presence of a biostimulant;
- the presence of a display that allows you to track the main indicators - the temperature and humidity inside the device;
- the ability to connect the battery, which is important in the event of a power outage;
- the possibility of turning trays automatically and manually;
- increased egg capacity;
- high hatchability of chicks;
- possibility of breeding chicks of various species of birds.

The negative aspects of the "TGB-210" are:
- poor quality water tank, which should be changed after the purchase of the device;
- poor fixation of eggs in the trays, which can lead to their loss when turning (this can be corrected by yourself, equipping the trays with additional fasteners from foam rubber pieces);
- poor quality of the cable, which organizes the rotation of the trays, it is also replaced after purchase;
Important! In models that were released after 2011, the cable was replaced with steel, and now there are no problems with turning the trays.
- a significant decrease in humidity when opening the incubator, which leads to rapid overheating of the eggs;
- regular damage of metal trays from corrosion due to high humidity in the device;
- no window on the device to control the incubation process;
- the high cost of the incubator, which makes it unprofitable to use it to breed a small number of chicks.

Instructions for the use of equipment
In order to get a good result from the incubation of eggs, it is necessary to properly use the device, so consider the step-by-step instruction manual "TGB-210".
Preparing the incubator for work
Before using the device for its intended purpose, it is necessary to assemble it. First of all, free all items from shipping packaging. From the upper tray of the incubator you need to get the fan, which is in the bag of soft material.
It should be cut and carefully remove the fan, set aside. Also in the upper tray, you can find the side rails that are attached to the bottom of the tray: they need to be released, remove the tie, remove the slats and carefully remove the upper tray.
Next, remove the fasteners from the control unit, and the nuts and screws that are marked in red, must be unscrewed with a screwdriver. 
Also, be sure to remove the shipping bar on the back of the device, which is marked in red. This strap is needed to immobilize trays so that they do not hang out during transport.
Important! If you forget to remove the back plate, the auto-rotate trays will not work.
Further, holding the upper part of the incubator, it is necessary to stretch the frame in height. Then you should attach the side panels in the center of each square frame, which has corresponding holes for screws. After it is necessary to proceed to fixing the fan with the help of screeds.
The fan is fixed in such a way that the movement of air during the operation of the fan is directed to the wall. The fan should be mounted on the upper grid, in the center of the incubator, from the side where the trays are drawn. Further, covers are put on over the constructed structure, and the device is ready for operation. 
Outside the whole structure remains the control unit. Connect the incubator to the electricity on the unit: on it you will see the temperature indicators. To adjust it, there are buttons "-" and "+", with which you can set the necessary indicators.
To go into the biostimulation mode, you need to hold down the two "-" and "+" buttons simultaneously and hold until 0 appears on the display. Then, using the "+" button, you need to select the desired mode - from 1 to 6.
In the incubator, after selecting the mode, you can hear the characteristic clicking sounds, which help to more friendly hatch chicks. To return the temperature to the display, set 0 and wait until the temperature appears.
To see the humidity, you need to sharply hold down the "-" and "+" buttons together. 
Egg laying
After the device is assembled, you can start laying eggs in trays. To make a bookmark you need a blunt end up. In order to make it easier to manipulate, it is recommended to install the tray almost vertically, immobilizing it.
You need to start filling the tray from below, holding the eggs that have already been installed a little. When establishing the last row, a small gap is often left, so it is necessary to fill it with a folded isolin strip.
The filled trays should be pushed into the cassette. If there are only enough eggs for 2 trays, it is recommended to install them above and below the axis of rotation of the cassette in order to be balanced.
If there are not enough eggs to completely fill the tray, place them in the front or back of the tray, not on the sides. If all trays are completely filled, the eggs, in which the development of the embryos has not occurred, must be removed before being removed. 
The remaining good eggs are evenly placed in all trays in a horizontal position. In this case, it is permitted that the eggs "crawl" a little on each other.
Incubation
In the first week of the eggs in the incubator, they should warm up well: for this, warm water is poured into the pan. In the first days, the incubator is set to a higher than usual temperature - + 38.8 ° C, the ventilation holes are closed.
After 6 days, the pallet with water is removed and the ventilation openings are opened - this is necessary to reduce the humidity and speed up the process of evaporation of the liquid. Such manipulations are necessary to increase the metabolic rate in the egg, improve the process of nutrition and excretion of waste.
Rotation of the trays should occur at least 4 times a day throughout the entire incubation process, except for the last 2-3 days before hatching. 
On day 6, the temperature in the incubator should also be lowered to + 37.5-37.8 ° C.
Important! If the temperature is not lowered, the hatching of the chicks will occur prematurely: in this case the chicks will be weak and small.
On the 12th day of incubation, eggs are hardened: for this, they are cooled twice a day. In order to cool the eggs, take the pan out of the incubator, set on a flat surface for 5 minutes, at a room temperature of +18 to + 25 ° C.
In the process of cooling the eggs cool to 32 degrees. After the specified time, pallets with eggs set in the included device. From 12 to 17 days, the temperature in the incubator should be at + 37.3 ° С, air humidity is maintained at 53%.
From 18 to 19 days the air temperature remains the same - + 37.3 ° С, and the air humidity drops to 47%, eggs are cooled twice a day for 20 minutes. 
From 20 to 21 days, the air temperature in the incubator drops to + 37 ° С, the air humidity rises to 66%, the eggs stop turning, the cooling time of the eggs is also shortened and two cooling sessions are performed for 5 minutes each.
Hatching chicks
When the time of hatching is nearing, the eggs lose a little sensitivity to temperature, and it can be lowered to + 37 ° C. Humidity in the process of hatching eggs should be at a high level - about 66%.
2-3 days before the planned hatching of chicks, try to minimize the number of incubator openings: the normal rate is 1 time in 6 hours, since the humidity drops sharply, and it takes some time for it to return to the normal value.
When the first egg is hatching, it is recommended to increase the humidity to the maximum. Usually within 3-4 hours the chick comes out of the shell. If after 10 hours this did not happen, you can break the shell with tweezers and help the chick a little. 
Nestlings that have just hatched must stay in the incubator for at least 24 hours. For 72 hours, the chicks can remain in the incubator without food, so do not worry about it. After the majority of the eggs have hatched, it is necessary to move the chicks to a brooder (nursery).
Device price
"TGB-210" is a fairly expensive device - its price usually exceeds the price of other similar devices. Depending on the equipment with a moisture meter, a Chizhevsky lamp, the price can vary from 16,000 to 22,000 rubles.
In Ukraine, the price of the device varies from 13,000 to 17,000 UAH. The price of the TGB-210 incubator in dollars varies from 400 to 600.
findings
Despite the relatively high price, the incubator "TGB-210" is popular for home breeding chickens, as it has a high hatchability rate. Despite some shortcomings in the device, you can easily fix them and replace the elements with better ones. 
Most of the people who used the TGB-210 incubator noted durability, convenience, reliability, and ease of use. Among the minuses note the appearance of rust on the trays and the metal case, increased noise during bioacoustic stimulation.
More budget incubators, which are also popular as home devices for breeding chicks and can compete with the "TGB-210", are such - "Lay", "Poseda", "Cinderella".
Did you know? In Europe, the first incubators appeared in the XIX century, and mass production of incubators for industrial purposes in the USSR began in 1928.
Thus, the use of the incubator "TGB-210" is quite simple, but in order to get a good result from the incubation of eggs, you must follow the instructions exactly and follow the basic recommendations that are given in our article.