Many rejoice at the arrival of winter with its snowy white blanket. And although admiring the winter landscapes brings high spirits, this period is also associated with additional troubles: when the snow falls too much, it makes it difficult to move in the yard and leave the car out of the garage. Also, snow can be blocked entrance doors to the house. Therefore, a good snow shovel can be for you an essential tool in case of snowfalls.
Necessary tools and materials
You can make a snow shovel from several materials:
- plywood;
- strong plastic (plastic canister or barrel);
- aluminum or galvanized sheet.
Did you know? Snow is not only white, but also brown, green or red. Such unusual colors give him unicellular algae living at low temperatures.
Also need:
- 2-meter wooden block (4 by 4 centimeters) or a ready-made cutting from old garden tools (shovels or rakes);
- plaque 50 centimeters long and 7 centimeters wide;
- Three strips of sheet metal or flexible metal 5 cm wide for strengthening edges and other details.
 Instrumentsthat are needed for the manufacture of snow removal tools:
- jigsaw;
- electric drill;
- screwdriver;
- plane;
- sandpaper sheet;
- emery for metal processing;
- wood impregnation;
- screws and small nails - as required;
- Bulgarian;
- hammer;
- two mounting bolts with nuts;
- Ruler and pencil.
Find out what criteria you need to choose a screwdriver.
Step-by-step manufacturing technology of a shovel
Next, consider in detail how to make equipment for snow removal from the above materials.
Making scoop
Let's start tinkering with a snow shovel with scoop manufacturing. Consider what materials are available in the household, it can be made.
Wooden
To make a wooden bucket, you need:
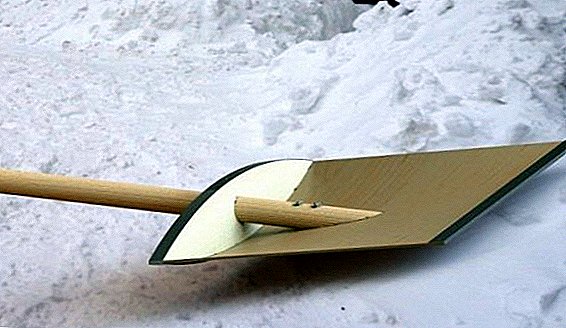
- Saw the square base of the scoop with an electric jigsaw from a sheet of plywood 6-10 mm thick - 50 to 50 centimeters.
- The edges of the slices must be treated with sandpaper to avoid injury in the process of manufacturing equipment.
- The base itself should be treated with wood from wetting to increase the service life of the tool.
- Then, in the upper part of the future scoop, drill several holes with a diameter of 4 millimeters and a distance between them of 3 centimeters.
Video: a shovel with a wooden bucket with his own hands
Metallic
The metal scoop is made of thick tin or aluminum. For this you need:
- Grinder cut from the original material canvas 40 by 60 centimeters.
- In order not to get hurt during the manufacturing process, the cuts on the finished rectangle need to be treated with emery.
- On the metal sheet, as on the wooden, holes are also made for the future fastening with the end sheet.
Important! The length of the spade handle should fit you in height - it is extremely inconvenient and tedious to work with a short one.
Video: a shovel with a metal scraper do it yourself
Plastic
A plastic barrel or a canister with walls of 6 millimeters can serve as a material for making the bucket. This is done like this:
- Cut the jigsaw plastic base scoop size of 50 to 50 centimeters.
- As in the cases with wooden and metal canvases, in a plastic scoop you also need to make 4-mm holes in its upper part.
Check out our tips and tricks for choosing a snow shovel.
We form the end part
After making the scoop base, proceed to the formation of its end part:
- From the board we cut a crescent 50 centimeters long. In the middle the crescent should be 8 centimeters wide, on each side - 5 centimeters.
- On the upper straight edge of it at an equal distance of 3 cm from each other, we drill with an electric drill a hole with a diameter of 4 millimeters. They are needed for the future fastening of the end part and the scoop blade with screws.

Making a Stalk
If there is no finished cutting in the farm, we make it from a wooden bar. Here is the process of its manufacture:
- Using a plane, we chamfer on the four sides of the bar and get a hexagon.
- Then the edges are treated with sandpaper.
- One end of the cutting is cut at an angle of 15 degrees.
- We retreat from the edge of the sawn cutting 5 centimeters and drill a hole for the mounting bolt.

Cutting out a hole in the faceplate
Now we need to make a through hole in the wooden end panel of the scoop. For this:
- We drill a hole in the center of the crescent, the diameter of which must be equal to the diameter of the future spade handle.
- We ream the hole with a bevel of 15 degrees to then attach the handle to the scoop canvas at an angle.
Read also about making your own shovels with auger and snowthrower.
Shovel assembly
Now from the base of the shovel, end panel and the handle we will assemble our snow removal tool:
- We fasten a wooden crescent with a metal, wooden or plastic cloth. To do this, you need to put a scoop on the crescent so that the holes made in them coincide.
- In the crescent moon, through the holes of the foundation laid on it, you need to drill for the screws with a 3 mm drill to a depth of 1.5 cm. This is done so that during the twisting of the screws in the crescent the latter does not crack and does not lose strength.
- Through the finished holes we fasten the sheet and the end panel with screws.
- Make the markup using a pencil and a ruler in the center of the scoop in the form of a straight line on which the handle will be attached.
- Saw off the cutting at an angle and insert the handle into the hole with a bevel.
- In the place of its contact with the blade we make a through hole in the scoop and attach the cutting with a bolt and nut.
- Drill a hole through the end panel and the handle and fasten with a bolt.
- Adjust the length of the cutting, according to the required growth.


It is useful to read about the tools needed for the summer resident to remove weeds and digging the ground, as well as: what is a miracle shovel and how to make it with your own hands; how to build a potato planter, potato thistle tiller, potato grater for corn.
Metal stripes upholstery
Now you need to make the strengthening of the finished scoop metal stripes. A metal strip 5 centimeters wide is fastened along its bottom edge. This is done like this:
- Bend in half lane.
- We put it on the bottom edge of the sovok canvas.
- Hit the strip with a hammer until it is fixed on the canvas.
- We hammer along the entire length of the strip several small studs for the strength of the product.
- With the other two metal strips we strengthen the joint of the bucket web and the end panel, as well as the connection of the scoop and handle.

Important! In order not to forget to store a snow shovel for storing after snow removal, paint its stalk in a bright color: it will remind you of itself, standing out brightly against the background of folded snowdrifts.
How to care for the tool
In order for our snow removal equipment to serve for more than one year, they need care, depending on the type of material the shovel is made of. Especially it concerns the period of its active exploitation.
If this plywood shovelthen after application it is necessary to dry to avoid deformation. For this tool you need to turn up the bucket and leave for some time in the open air. During long-term storage, the metal border must be lubricated with technical oil. With intensive work, a wooden shovel quickly becomes unusable, so you need to monitor its integrity and repair it in time, and if necessary, replace it with a new one.
Important! It will be useful to remind you that all work on the maintenance of snow removal equipment should be done after it is cleaned of dirt.
Snowblower with metal shovel, edging and mounts especially needs processing engine oil. Such shovels are stored in a suspended state in rooms without high humidity.  Shovel out plastics after snow removal work clear of ice and dirt under warm running water. Plastic inventory is afraid of sudden temperature changes, so it should be stored at a stable temperature in a cool room.
Did you know? From the 1970s until recently in USA races were held over the snow on shovels. They came up with ski instructors. When the working day was over, the lifts were no longer working, and all skis were handed over to the warehouse. The instructors found a way out: saddling snow shovels, they moved down from the top of the mountain. Subsequently, such races were banned due to injury risk.
Snow shovel: reviews

Thus, all of the above options for snow shovels of different materials can be made without a great investment of time, effort and money. If you carefully handle this homemade inventory, repair it in time and properly care for it, it can serve you for many years.