Potted plants, in principle, do not accept the accumulation of moisture in the pot. After all, the constant stay of the roots in a humid environment, leads to the appearance of rot, the development of infectious diseases.
Perhaps only moisture-loving varieties of flowers tolerate excess fluid in the soil quite well, orchids are not one of them. Therefore, it is important to provide a drainage layer in pots. Let's talk today about the materials for drainage of orchids, which are best suited to the flower, and which ones are not recommended. You can also watch a useful video on this topic.
Do I need a drainage layer and what is it?
The layer of fractional material, which is designed to remove excess water from the soil, is called drainage. Drainage is necessary so that the root system of plants can breathe.
With abundant moisture, the air exchange in the pot is disturbed, due to which a large number of bacteria and pathogenic microorganisms develop. They are the main cause of root diseases. Subsequently, the plant quickly fades, suspends growth, drops buds. To avoid such troubles, make special holes in the pot, and drainage material is placed on the bottom.
How to choose correctly?
Orchids are unique plants, and the substrate for their cultivation does not consist of ordinary land.. Therefore, at the expense of drainage for exotic beauties opinions diverged.
Some flower growers believe that the drainage layer for epiphytes only retains moisture in the pot, and does not allow for full air circulation. As a result, the root system begins to rot. Opponents, however, heed that drainage is just the boundary that prevents the roots from absorbing excess moisture. At the same time, the liquid evaporates freely, increasing the humidity of the air. And yet, when choosing a drainage should be drawn to the following characteristics:
- low chemical activity;
- hygroscopicity;
- ease;
- good flowing ability;
- long term of use;
- resistance to rotting processes.
What can be used?
The drainage layer is often used: expanded clay granules, crushed stone, pebbles, small pebbles, sand of large fractions, foam plastic, gravel, perlite, vermiculite and other materials. The most effective include:
River pebbles, pebbles
 Used often due to their easy accessibility.
pros: Hygroscopicity, environmental friendliness, durability.
Minuses: Pebbles weighing flower pots. However, this disadvantage can be turned into a virtue if a light flower pot is used. Another disadvantage is high thermal conductivity.
If you put a pot with pebbles on a cold surface, you can get a supercooling of the root system. As a preventive measure, river material should be washed.
Styrofoam
 Recently, it has become a popular drainage material.
pros: Not affected by rot and mildew, chemically inert, sterile. I especially want to note that the foam does not absorb and does not give up water.
Minuses: Ease, the ability of roots to grow through the foam.
We recommend to watch a video about using foam plastic for orchid drainage:
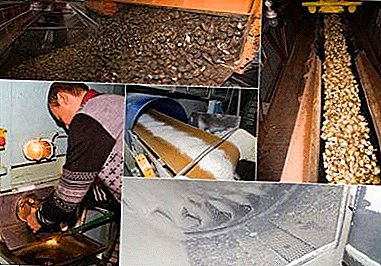
Expanded clay
 Is it possible to plant an orchid in expanded clay drainage? This raw material is widely used. The material is a granule of different diameters. It is made by firing clay. Expanded clay has lightness, non-toxicity, durability, service life of 5-6 years.
pros: The material has the ability to absorb moisture, and, if necessary, give back.
Minuses: With frequent dressings in the pores of claydite, salt may accumulate, and if it is not noticed in time and washed along with the plant, the roots will burn.
We recommend to watch a video about the pros and cons of growing orchids in claydite drainage:
Broken brick rubble
 It is advised to use small pieces, with smooth edges, so that they do not damage the orchid root system.
pros: They have strength, hygroscopicity, considerable weight.
Minuses: Not good enough to keep warm.
Red brick, like expanded clay, is made on the basis of clay. Therefore, if it is not possible to buy expanded clay, you can use crushed brick.
What should not be used for drainage?
Important: It is not recommended to use organic materials as a drainage layer because they are torn to rot.
It is undesirable to use river sand that can clog drainage holes in the pot.. Marble chips, when interacting with water, change the acid composition of the soil, to which the orchid reacts sharply.
Egg shells, walnut shells, moss, dry leaves, tree bark are also not advised to choose. These natural components have the ability to rot, what provokes the development of pathogenic fungi.
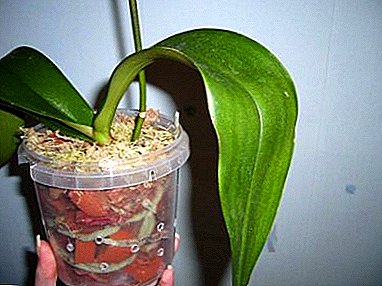
Step-by-step instructions for landing in claydite
In their natural habitat, epiphytic orchids grow on trees and rocks.. At the same time they get food and moisture from wood bark, air, as a result of rains. This ability has a rare species of flowers.
Therefore, they successfully conducted an experiment on planting an orchid in a container with only expanded clay. Especially liked the lovers of flowers in such conditions to reanimate plants that have lost their roots.
As already stated expanded clay is an inert material that does not decompose, rot, pressure test. At the same time, the root system sufficiently receives the air mixture, moisture. Planting an orchid in expanded clay contains several stages:
 We get expanded clay granules. Their size depends on the thickness of the roots. The larger, thicker the root system, the larger the fraction of expanded clay.
- Thoroughly wash the substance with hot water.
- We place in a container, fill it with phytohormones and leave for a day.
- We select the right pot. It is advisable to take a plastic, transparent landing capacity.
- We make holes for drainage at the level of: 1 cm from the bottom (for a volume of 0.3-0.5 l), 1.5 cm (for a capacity of 0.5-1 l), 2 cm (for a capacity of 1.5 -2 l). We also pierce the holes in the side walls for ventilation.
- We take out the orchid from the old substrate.
- We clean the root system and wash well under running water.
- Give some time to dry.
- Fill half of the pot with prepared clay.
- Place the flower in the center.
- The remaining space, to the top, filled with expanded clay.
- Pour over defended, clear water to the level of the upper side holes.
 We get expanded clay granules. Their size depends on the thickness of the roots. The larger, thicker the root system, the larger the fraction of expanded clay.
Board: Orchid roots are placed mainly in the upper layers. In the process of care, do not forget to feed the orchid twice a month.
We recommend to watch a video about orchid transplanting in claydite drainage:
Conclusion
Of course, the drainage layer is needed when growing orchids. Moreover, in its creation there are no difficulties. It is enough only to purchase the appropriate material at its discretion. The main thing is to grow orchids comfortably.